Quick setup guide. First we start by setting up the environment
Setup Git – https://github.com/git-guides/install-git
Install Python – https://www.python.org/downloads/
Get Docker Desktop – https://www.docker.com/products/docker-desktop/
Get and OpenAI API Key – https://platform.openai.com/account/api-keys
Next we Clone the Repo
Run the following once the above has been carried out.
cmd > git clone https://github.com/Torantulino/Auto-GPT
Navigate into the Auto-GPT directory
cmd > cd Auto-GPT

Edit the .env.template file and insert your OpenAI API Key variable into line no. 3
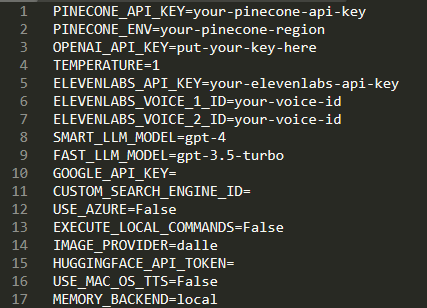
Save the modified file as .env
Install Python libraries
cmd > pip install – requirements.txt
Start the Docker
After Docker is installed run the following command to start Docker
cmd > docker run -d -p 80:80 docker/getting-started
you should see something like this (I’m running this test version on Windows)

Here’s where the fun starts:
Run python scripts/main.py and follow the terminal prompts. (%Path%/Auto-GPT/scripts/main.py)
You can choose between a fully autonomous continuous mode or manual approval of each action.
For continuous mode, run this: cmd > python scripts/main.py –continuous
(If that’s all too hard, use this Browser based version https://agentgpt.reworkd.ai/ and supply your own API key ;))
Enjoy!!

Leave a comment