MystaJoneS

If you're not making mistakes, then you're not doing anything.

  • Want to install and manage OpenClaw without repeatedly searching through documentation? Here’s a practical command reference covering installation, onboarding, configuration, models, channels, Gateway management and troubleshooting.

    Commands may change between releases, so check your installed version with:

    openclaw --version
    openclaw --help
    openclaw <command> --help

    1. Install OpenClaw

    macOS, Linux or WSL2:

    curl -fsSL https://openclaw.ai/install.sh | bash

    Windows PowerShell:

    iwr -useb https://openclaw.ai/install.ps1 | iex

    The installer detects the operating system, provisions Node.js when necessary, installs OpenClaw and launches onboarding.

    To install without starting onboarding:

    curl -fsSL https://openclaw.ai/install.sh | bash -s -- --no-onboard

    Manual npm installation:

    npm install -g openclaw@latest --allow-scripts=openclaw
    openclaw onboard --install-daemon

    OpenClaw currently requires Node.js 24.16+ or 26.1+, with Node 26 recommended. Full installation options are documented in the official installation guide.


    2. First-time setup

    Run the guided onboarding process:

    openclaw onboard

    Install OpenClaw’s managed Gateway service during onboarding:

    openclaw onboard --install-daemon

    Other useful setup options:

    openclaw setup
    openclaw setup --wizard
    openclaw setup --classic
    openclaw setup --baseline
    openclaw setup --workspace ~/my-openclaw-workspace
    openclaw setup --json

    What they do:

    • setup — chat-based setup assistant
    • setup --wizard — complete interactive onboarding
    • setup --classic — traditional multi-step wizard
    • setup --baseline — create only the base configuration and workspace
    • onboard — configure authentication, models, Gateway, workspace, channels and skills

    Remote Gateway setup is also supported:

    openclaw setup \
    --non-interactive \
    --accept-risk \
    --mode remote \
    --remote-url wss://gateway.example.com \
    --remote-token '<token>'

    Never publish real API keys, passwords or Gateway tokens in screenshots, posts or shell history. The internet already contains enough avoidable excitement.


    3. Reconfigure an existing installation

    Launch the interactive configuration wizard:

    openclaw configure

    Configure only selected areas:

    openclaw configure --section workspace
    openclaw configure --section model
    openclaw configure --section web
    openclaw configure --section gateway
    openclaw configure --section daemon
    openclaw configure --section channels
    openclaw configure --section plugins
    openclaw configure --section skills
    openclaw configure --section health

    Multiple sections can be combined:

    openclaw configure \
    --section model \
    --section channels \
    --section health

    The available configuration sections and their behaviour are covered in the configure command reference.


    4. Non-interactive configuration

    Find the active configuration file:

    openclaw config file

    Read a setting:

    openclaw config get gateway.port
    openclaw config get agents.defaults.model --json

    Change a setting:

    openclaw config set gateway.port 18789
    openclaw config set agents.defaults.heartbeat.every "2h"

    Remove a setting:

    openclaw config unset agents.defaults.fastModeDefault

    Apply several changes from a JSON5 patch:

    openclaw config patch \
    --file ./openclaw.patch.json5 \
    --dry-run

    Validate before restarting anything:

    openclaw config validate
    openclaw config validate --json

    Inspect the complete configuration schema:

    openclaw config schema
    openclaw config schema --json

    Use --dry-run where supported before making important changes. Full examples are in the configuration CLI reference.


    5. Configure models and providers

    Inspect model status:

    openclaw models status
    openclaw models status --json

    List available models:

    openclaw models list
    openclaw models list --provider ollama

    Set the primary model:

    openclaw models set openai/gpt-5.6-sol

    Manage authentication:

    openclaw models auth list
    openclaw models auth login --provider openai

    Manage fallbacks:

    openclaw models fallbacks --help

    Other model commands include:

    openclaw models refresh
    openclaw models aliases --help
    openclaw models accounts --help
    openclaw models set-image <provider/model>
    openclaw models image-fallbacks --help

    Use the models command reference for provider-specific authentication and model routing.


    6. Optional local models with Ollama

    Install Ollama, then download a model:

    ollama pull gemma4

    Run OpenClaw onboarding and select Ollama:

    openclaw onboard

    Verify model discovery:

    openclaw models list --provider ollama

    Make the local model your primary:

    openclaw models set ollama/gemma4

    OpenClaw’s onboarding supports local-only, cloud-only and combined Ollama configurations. See the official Ollama setup guide.


    7. Configure messaging channels

    List configured channels:

    openclaw channels list

    Show available and installable channels:

    openclaw channels list --all

    Add a channel using guided setup:

    openclaw channels add

    Examples:

    openclaw channels login --channel whatsapp
    openclaw channels add --channel telegram --token '***'

    Inspect live channel health:

    openclaw channels status
    openclaw channels status --probe

    Useful channel commands:

    openclaw channels capabilities
    openclaw channels logs --channel all
    openclaw channels resolve --channel slack "#general"
    openclaw channels dead-letters list

    Channel configuration and troubleshooting are covered in the channels CLI guide.


    8. Manage the Gateway

    Check the service:

    openclaw gateway status

    Start, stop or restart it:

    openclaw gateway start
    openclaw gateway stop
    openclaw gateway restart

    Install or remove the managed service:

    openclaw gateway install
    openclaw gateway uninstall

    Run it directly in the foreground:

    openclaw gateway run

    Replace an existing listener on the configured port:

    openclaw gateway run --force

    Test connectivity:

    openclaw gateway health
    openclaw gateway probe
    openclaw gateway stability

    Export support information:

    openclaw gateway diagnostics

    Discover Gateways on the network:

    openclaw gateway discover

    The Gateway is OpenClaw’s WebSocket service for channels, sessions, nodes and hooks. Its complete command set is documented in the Gateway CLI reference.


    9. Health checks and diagnosis

    Start with the quick checks:

    openclaw health
    openclaw status
    openclaw gateway status

    Run a detailed read-only diagnosis:

    openclaw status --all
    openclaw status --deep
    openclaw status --usage
    openclaw status --json

    Check configuration and runtime health:

    openclaw doctor
    openclaw doctor --lint
    openclaw doctor --lint --severity-min warning
    openclaw doctor --deep
    openclaw doctor --json

    Apply recommended repairs only after reviewing the findings:

    openclaw doctor --fix

    Non-interactive repair:

    openclaw doctor --fix --non-interactive

    Additional diagnostic commands:

    openclaw logs
    openclaw channels logs --channel all
    openclaw channels status --probe
    openclaw models status
    openclaw config validate
    openclaw security --help
    openclaw update --help

    doctor can inspect configuration, model routing, plugins, skills, channels, Gateway services, local state and migrations. See the official Doctor guide.


    10. The “something is broken” checklist

    Run these in order:

    openclaw config validate
    openclaw health
    openclaw gateway status
    openclaw models status
    openclaw channels status --probe
    openclaw status --all
    openclaw doctor --lint

    If the findings recommend repairs:

    openclaw doctor --fix
    openclaw gateway restart
    openclaw status --deep

    That gives you a complete OpenClaw toolkit: installation, onboarding, targeted configuration, scripted configuration, local Ollama models, channel management, Gateway control and diagnostics.

    Full CLI index:
    https://docs.openclaw.ai/cli

    #OpenClaw #Ollama #LocalAI #SelfHostedAI #OpenSourceAI #ArtificialIntelligence #Automation #Linux #DevOps #AIInfrastructure

  • I’ve configured OpenClaw to use OpenAI as its primary model and automatically fall back to a locally hosted Ollama model if cloud access or usage limits become an issue.

    Here’s the basic setup:

    1. Install Ollama

    Download it from:
    https://ollama.com/download

    2. Download a model

    ollama pull gemma4:e4b

    You can check installed models with:

    ollama list

    3. Let OpenClaw discover Ollama

    export OLLAMA_API_KEY="***"
    openclaw models list --provider ollama

    For an entirely local setup:

    openclaw models set ollama/gemma4:e4b

    Alternatively, keep a cloud model as the primary and add Ollama as the fallback:

    {
    agents: {
    defaults: {
    model: {
    primary: "openai/gpt-5.6-sol",
    fallbacks: ["ollama/gemma4:e4b"]
    }
    }
    }
    }

    The result? Cloud performance when available, with a private local backup ready to take over when needed—no frantic shouting at a usage-limit screen.

    Always use the exact model name shown by ollama list.

    Official guide:
    https://docs.openclaw.ai/providers/ollama/setup

    #OpenClaw #Ollama #LocalAI #SelfHosted #ArtificialIntelligence #OpenSourceAI

    +
  • openclaw config set gateway.bind lan

    openclaw config set gateway.controlui.allowedOrigins your-ip-or-hostname:18789

    openclaw gateway restart

    +
  • Old PC

    openclaw gateway stop

    mkdir -p ~/Backups/openclaw
    (
    umask 077
    archive=”$HOME/Backups/openclaw/openclaw-state-$(date +%Y%m%d-%H%M%S).tar.gz”
    tar -czf “$archive” -C “$HOME” .openclaw &&
    tar -tzf “$archive” >/dev/null &&
    printf ‘Archive created and readable: %s\n’ “$archive”
    )


    If you are using SSH to transfer the image from one linux box to another.

    sudo apt install openssh-server

    modify the /etc/ssh/sshd_config

    restart the sshd deamon >> sudo systemctl restart ssh


    New PC

    openclaw backup restore openclaw-state-20260928-115121.tar.gz –target ~/openclaw-restored

    (
    umask 077
    staging=$(mktemp -d “$HOME/openclaw-restored.XXXXXX”) || exit 1
    tar -xzf “$HOME/Backups/openclaw/openclaw-state-20260928-115121.tar.gz”
    -C “$staging” –no-same-owner &&
    printf ‘Restored to staging: %s\n’ “$staging”
    )

    python3 /home/mystajones/Backups/openclaw/migration-20260928-122652/activate-gyro.py


    Other handy commands.

    Connect WhatsApp

    openclaw channels login –channel whatsapp

    Get your auth-token

    openclaw gateway auth-token –show

    +

  • 🔧 1. Legacy Applications and Systems

    • Many mining environments still use legacy ERP, SCADA, or other operational systems that depend on traditional AD for authentication and cannot integrate directly with Entra ID.
    • Examples include:
      • Old Windows services or servers using NTLM/Kerberos
      • On-premise SQL Servers tied to domain accounts
      • Equipment management software that doesn’t support modern auth

    🛠️ 2. Industrial Control Systems (ICS) and OT Environment Integration

    • Operational Technology (OT) in mining sites may not be internet-facing and often relies on air-gapped or isolated domains.
    • Integrating Entra ID directly into these environments is risky or impractical due to:
      • Limited or no cloud access from OT networks
      • Strict regulatory requirements
      • Need for real-time, local authentication with low-latency

    🧰 3. Group Policy and Local Machine Management

    • Group Policy Objects (GPOs) are still only available via on-prem AD, not Entra ID.
    • This is crucial for:
      • Controlling security settings
      • Device configuration for domain-joined Windows machines
      • Managing shared resources (e.g., file servers, print services)

    🔐 4. Kerberos Authentication and Advanced Access Controls

    • Some mining systems require Kerberos authentication, which Entra ID does not support in the same way as AD.
    • On-premise AD allows for:
      • Delegated authentication
      • Fine-grained service account permissions
      • Trust relationships between domains (for joint ventures, etc.)

    🚧 5. Site Reliability and Offline Operation

    • Remote mining sites can suffer from limited or unreliable internet connectivity.
    • On-prem AD ensures:
      • Continued user and service authentication during outages
      • Access to local resources even if the cloud is unreachable
      • Independence from cloud-based identity during network failure

    🧾 6. Compliance, Audit, or Sovereignty Requirements

    • Some mining companies are subject to Australian data sovereignty, ISO, or other compliance requirements that mandate local identity controls.
    • On-prem AD supports:
      • Centralized audit logging
      • Custom security models aligned with internal policies
      • Easier integration with local SIEM and compliance tools

    🛤️ 7. Hybrid Model is Often the Best Fit

    • Most mining companies today operate in a hybrid identity model:
      • On-prem AD + Entra ID via Entra Connect (Azure AD Connect)
      • Use Entra ID for M365, SaaS apps, and mobile workers
      • Retain AD for core infrastructure, OT, and reliability

    Summary Table

    ReasonOn-Prem ADEntra ID
    Legacy apps support✅❌
    GPO support✅❌
    OT/ICS integration✅❌
    Offline operations✅❌
    Kerberos authentication✅❌
    Modern cloud-based services❌✅
    Mobile workforce & SaaS auth❌✅
    Zero Trust & Conditional Access❌✅

    If you’re modernising, the goal should be to minimize reliance on on-prem AD over time — but in mining, it’s rarely safe or practical to eliminate it entirely without a long and careful transition, especially in sites where uptime and legacy system integration are critical.

    +
  • Docker images:

    ip addr add 10.0.0.10/24 dev eth0
    ip route add default via 10.0.0.10

    FortiGate images:

    comfit system interface
    edit port1
    set ip 10.0.0.11 255.255.255.0
    set allowaccess ping https ssh
    end

    Palo Alto images:

    # set deviceconfig system type static
    # set deviceconfig system ip-address 10.0.0.12 netmask 255.255.255.0 default-gateway 10.0.0.1
    # commit

    + ,
  • If your eve-ng web concole can not login, try one of these ways:

    1. To fix permission, enter this command in eve-ng console or ssh “/opt/unetlab/wrappers/unl_wrapper -a fixpermissions”

    2. Check the avalability of your eve-ng HD using “df -h” and chek wether the disk is full. If it is full, expand the HD by create new SCSI card drive in VM Ware.

    3. Fix eve-ng SQL database using “unl_wrapper -a restoredb” in your eve-ng console or ssh.

    + ,
  • I ran into some curly ones with eve-ng. Basically, I had to do the following:

    On Windows under core isolation turn off memory integrity

    Run the following (As admin) bcdedit /set hypervisorlaunchtype off

    Restart and this will allow you to use the processor virtualistion within VMware that is required.

    +
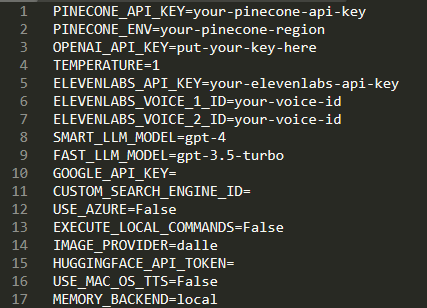
  • Quick setup guide. First we start by setting up the environment

    Setup Git – https://github.com/git-guides/install-git

    Install Python – https://www.python.org/downloads/

    Get Docker Desktop – https://www.docker.com/products/docker-desktop/

    Get and OpenAI API Key – https://platform.openai.com/account/api-keys

    Next we Clone the Repo

    Run the following once the above has been carried out.

    cmd > git clone https://github.com/Torantulino/Auto-GPT

    Navigate into the Auto-GPT directory

    cmd > cd Auto-GPT

    Edit the .env.template file and insert your OpenAI API Key variable into line no. 3

    Save the modified file as .env

    Install Python libraries

    cmd > pip install – requirements.txt

    Start the Docker

    After Docker is installed run the following command to start Docker

    cmd > docker run -d -p 80:80 docker/getting-started

    you should see something like this (I’m running this test version on Windows)

    Here’s where the fun starts:

    Run python scripts/main.py and follow the terminal prompts. (%Path%/Auto-GPT/scripts/main.py)

    You can choose between a fully autonomous continuous mode or manual approval of each action.

    For continuous mode, run this: cmd > python scripts/main.py –continuous

    (If that’s all too hard, use this Browser based version https://agentgpt.reworkd.ai/ and supply your own API key ;))

    Enjoy!!

    +
  • Add an Environment Variable

    Select “New…” under “System variables”

    Input the text below and select “OK”

    Variable name: OPENSSL_ia32cap

    Variable value: ~0x200000200000000

    Confirm that the variable has been added successfully, then select “OK”

    Enjoy

    +